Search Results
August 12, 2011
By: John Taber
Category: Games, Growlings, Product Reviews
Summary
Welcome to part 3 of my 3 part series on My Gaming Kit. In this article I’ll cover the place where I hold all of my games…the Cottage! The Cottage is a free standing structure that sits behind my house. (It was initially designed as a “Mother In Law” for the main house.) As the structure is completely free standing games can get pretty loud before anyone complains. 😉
Amenities
Here are the things that make the Cottage a GREAT place to game. (If you are reading this on my blog then you can click on the thumbnails to open high resolution versions that point out the various aspects of the Cottage. 😉 )
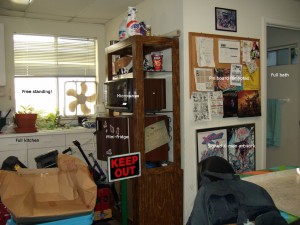
- Kitchen – The Cottage includes a sink, microwave, mini-fridge for beer…I mean beverages, and a gas stove top. It is really nice having all of this separate from the main house.
- Bathroom – It has it’s own bathroom so smelly gamers will not pollute the main house.
- Octagonal Table – Sermin’s Dad conveniently decided he did not want his old octagonal poker table. By adding a restaurant pillar to the center I ended up with a fantastic table for gaming. I have really come to like the octagonal shape. The square edges allow one to pull up a chair and the overall round shape really focuses the players in on the action.
- Office Chairs – I have office chairs without arms for everyone except the GM. The GM gets a fancy high backed office chair with arms…one of the GM perks in my “RPG Man Cave”. 🙂
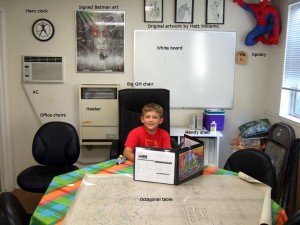
- White Board and Pin Board – One wall has a white board and another has a pin board. The white board is really valuable for fast sketches and the pin board is nice for rule cheat sheets, pizza coupons, and Dork Tower comics.
- Shelves – Immediately behind the GM chair and under the white board my Dad made a set of short shelves. These act as a small desk for the GM and allow him to easily access books or other gaming materials.
- AC and Heat – The Cottage has a window AC unit and a wall heater. (See below for comments on the AC.)
Current Issues
The Cottage is still a work in progress. Here are some things that I would like to see improved.
- AC – Dad and I installed a window AC but it cannot keep up with 6 gamers on a hot summer day. I may want to consider a second window AC or maybe a larger one. It is also really loud. 🙁
- Rainy Season – During the rainy season the carpet near the doors gets wet. Turns out that the room has no sub-floor (i.e. it is built straight on a concrete slab). Thus water can sheet under the door during a heavy rain. 🙁
If there are things in your gaming room that I do not have I would LOVE to hear about it! Post a comment on this blog post with your suggestions. My players can post too if there is something that they would like to see. 😉
Hope you enjoyed the My Gaming Kit series! 😀
No Comments →
July 03, 2011
By: John Taber
Category: Games, Growlings, Product Reviews
Summary
Welcome to part 2 of my 3 part series on My Gaming Kit. In this article I’ll cover my hardware and software setup. About 4 years ago I switched over from a binder to running from a laptop. Last year I purchased a netbook just for gaming. It has been a really fun toy! 😀
Hardware
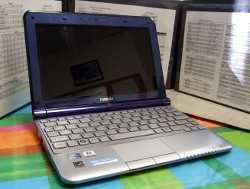
The netbook that I have selected to use for my gaming is the Toshiba Mini Notebook MB305-N440BL. It has an Intel Atom Processor N455, 2 GB RAM (I upgraded the RAM from 1 GB), 250 GB HD, WiFi, and a Webcam. It is running Microsoft Window 7 Home Premium. I really love this little netbook for a couple of reasons:
- Size Factor – The low profile of the netbook means that it can fit entirely behind my LANDSCAPE GM screen (see accompanying screen shot) and does not obstruct vision to the players. The small size and weight also means that I can easily slip it into my laptop backpack and cart it along with me to gaming session and conventions. Last DunDraCon I had it on my lap during several of the seminars to take notes. It worked great. 🙂
- Battery Life – One of the main reasons I chose the Toshiba MB305 is the battery life. This little sucker can go 8 hours on a single charge! I am NOT using an aggressive power saving setup and I have never had it run out of power during a session. Not needing a power cable also means less clutter around my GM station which is great.
- No Cables Needed – As I don’t need cables for a mouse, power, or network my GM area is very clean. I can also easily pick up the little netbook and flip it around to show my players various artwork and such.
- Webcam – The webcam means that if a player cannot attend a session in person they can attend over Skype or I can record the session. A nice plus. 😉
Software
It was important to me to find a solution that could run Windows. There are several software packages that are critical for me to have access to while creating the session and during the session (see below). The decision to purchase a device that runs Windows ruled out nearly all of the current tablets. Here is the list of software the I currently utilize for gaming on my netbook:
- The Keep Under Dropbox For Managing Campaign Materials – This combination is the star of my GM software kit. It allows easy access to all of my campaign materials across devices while providing internal and external references. This is a really nice combo. For details check out a more detailed review of this that I did in March 2010 at this URL.
- Fractal Mapper 8 And Dundjinni – These are two great mapping programs that I use when I want a campaign map or special encounter. Fractal Mapper 8 is really simple to use and I find it works very well for campaign level maps. Dundjinni works great for combat level maps. You can create really nice maps in a flash with Dundjinni. Unfortunately I am not sure how much support is available for Dundjinni at the moment. 🙁 Here is a link to where you can purchase Fractal Mapper 8 on DriveThruRPG.com. Here is a link to the main Dundjinni site.
- Hero Designer – Hero Designer is essentially a must have for any Hero GM. It is so amazingly powerful that every time I use it for a new campaign I find some feature that I did not know existed. The campaign customization is very nice as it allows source data used by Hero Designer to be modified so that it fits your Hero campaign perfectly. Great stuff. Here is a link to a 2 year license agreement on the Hero site.
- Everchanging Book Of Names (EBoN) – EBoN is hands down my favorite random name generator. There are a lot of options like generating many names in a list that are really wonderful. For a very paltry donation you can get access to all of the fantastic libraries of names. Like The Keep I installed it to Dropbox. BOOM! Killer combo. 😀 Here is a link to the site where you can find EBoN.
- GIMP – GIMP is a freeware paint program with so many features that it is really mind boggling. I really need to buy a book about GIMP so that I can learn all of the features of this powerhouse tool. Normally I would not mention a generic utility like this but GIMP is really nice for slight image changes that GM may need to make. You can download it for free at this URL.
- Acrobat For Those Game Book PDF – Acrobat is a must. It really offloads the need to carry any books with you on the road. As I am a Hero GM that means roughly 50 pounds or so! Ok fine…maybe not 50 pounds but you get the idea. I also love being able to add comments and redlines to PDF modules using the registered copy of Acrobat. This way I can alter description texts, add notes related to my players, etc. Oh yeah…all the PDF go on Dropbox so I can get at them on any machine. Awesome jam on kick fanny toast. 🙂
Next up…My Gaming Kit: Part 3 – The Cottage! 😀
No Comments →
April 23, 2011
By: John Taber
Category: Games, Growlings, Product Reviews
Summary
In Ryan “F-ing” Macklin’s blog he posted an article on “convention kits”. That got me thinking about the gear that I use for gaming and why I have selected it. This is the first of three article that I will use to discuss the gaming gear that I currently use and why it works for me. The first article details my gaming bag (i.e. “The Guts”). My netbook and the critical components of it will be covered in article 2. The final article will be on my game room setup.
Whenever possible I will put links to where this gear can be purchased online.
The Guts
- Jansport Laptop Backpack – I use a laptop backpack as my main carrying device. It has a large main pouch with a padded area for my netbook and two nice sized outer pouches for carrying dice bags, writing tools, and other miscellaneous gear. I also have a custom messenger bag but I prefer the Jansport Laptop Backpack because of it’s comfort when carrying lots of heavy gear. (Note that I could not find the model number that I have as I removed the tag.) I have heard other gamers recommending the Gator Carry On Bag from a company called Red Oxx. Right now I will stick with my Jansport backpack but this bag does look promising.
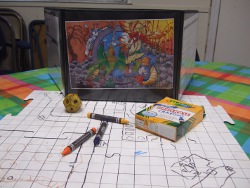
- Savage Worlds Customizable GM Screen – The sturdy Savage Worlds Customizable GM Screen has a landscape layout with inserts for all 6 sides. I really love the fact that I can just replace the inserts with new sheets when I change campaigns. In fact I have several inserts available for download from my site in the Campaigns And Adventures section. The landscape layout is also great as I can still see the players clearly and do not feel fenced off. You can get a copy from Amazon at this
 URL for $29.99.
- Standard Wooden Clipboard With A TOPS Engineering Computation Pad – I use a standard wooden clipboard and a pad of engineering paper. Engineering paper has graph paper on the reverse side and is 3 holed punch. You can get TOPS Engineering Computation Pads on Amazon for $19 at this
 URL.
URL.
- Pentel GraphGear 1000 Mechanical Pencil And Tombow MONO Plastic Eraser – This Pentel is a solid feeling .9mm mechanical pencil that collapses with a click. I like the .9mm lead size as it gives a dark clean line. You can get the pencil on Amzaon for $33.10 at this
 URL. I know…it is expensive. The MONO eraser from Tombow is from Japan but they can be purchased at most good stationary stores or online from the manufacturer. It erases very well with no damage to the paper.
- Battlegraph Dry Erase Boards from Longtooth Studios With Crayola White Board Crayons – Battlegraph Boards are interconnecting gaming squares that are finished like a white board with etched squares. After playing with them now for several months they have really grown on me. I like the fact that 4 of them disconnect and easily fit in my backpack. I also like the way the entire assembled board can be rotated with chits still in place. Boards with squares or hexes are now sold individually for $7 from Longtooth. The Battlegraph Boards really shine with Crayola White Board Crayons. The Crayons don’t rub off as easy as white board pens and don’t smear when touched by a loose finger. I use these suckers for several things during a session…keep reading! 🙂 You can get the Crayola White Board Crayons from Amazon at this
 URL for a paltry $4.83.
- Hand Made Chits – Instead of using figures I use cardboard chits roughly 0.75″ square that I cover with Scotch tape. I like using chits because they are easy to cart around, can be flipped, stacked, or placed on top of dice, and they can be colored and numbered for easy reference. I color code and number my chits sequentially so that no two chits have the same number. For example, chits 1-10 are red, chits 11-20 are blue, chits 21-30 are green, etc. This way when I am tracking bad guy stats I just put “13”, “21”, etc on my notes. The colors allow me to differentiate the different types of bad guys (i.e. “the red chits are the PC, the orc are green, and the ogres are blue”).
- Laminated Speed Chart And Big Foam D12 – I run a lot of the Hero System so keeping track of phases and making it public is important. I use a laminated speed chart that Tim Connolly devised. Here is a link to the file on my site. This works great with my Crayola White Board Crayons. The roughly 3″ foam D12 is used to visibly track the phases. Unfortunately I do not have information on who manufactured the foam D12 that I using.
- Plastic Sheets Protectors For Monsters – I bring copies of monsters that will be in the session and several empty plastic sheet protectors. When combat starts I arrange the bad guys in Dexterity order then put them into a sheet protector. During the session I can use my handy dandy Crayola White Board Crayons to record damage and status information.
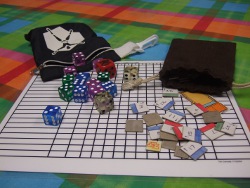
- Koplow 16mm D6 Dice With Pips And Square Corners – I really have come to appreciate dice that are clear, can be quickly read, and fall fast. I really like the blocks from Koplow as the fit all of these requirements and look darn nice too. 🙂 Here is a link to a set of 12 at FRP Game for $4. I have blue, green, and purple sets right now.
- Larger Clear Dice – I have dice that are a bit larger (0.75″) and clear that I use to delineate characters that are flying or invisible. These really work great for flying character as you can set the top dice face to the height of the character. The slightly larger size makes them a good fit for chits.
- Additional Con Gear – For conventions I like to load my ditty bag with some not so obvious supplies. Some things I like to bring include cough drops, hand sanitizer, multivitamins, and ear plugs. All have an obvious purpose that most convention attendees will understand. 😉
That wraps up my basic gaming kit. What are some items in your standard gaming kit that you think really rock!?! 😀
No Comments →


