My Gaming Kit: Part 1 – The Guts
Summary
In Ryan “F-ing” Macklin’s blog he posted an article on “convention kits”. That got me thinking about the gear that I use for gaming and why I have selected it. This is the first of three article that I will use to discuss the gaming gear that I currently use and why it works for me. The first article details my gaming bag (i.e. “The Guts”). My netbook and the critical components of it will be covered in article 2. The final article will be on my game room setup.
Whenever possible I will put links to where this gear can be purchased online.
The Guts
- Jansport Laptop Backpack – I use a laptop backpack as my main carrying device. It has a large main pouch with a padded area for my netbook and two nice sized outer pouches for carrying dice bags, writing tools, and other miscellaneous gear. I also have a custom messenger bag but I prefer the Jansport Laptop Backpack because of it’s comfort when carrying lots of heavy gear. (Note that I could not find the model number that I have as I removed the tag.) I have heard other gamers recommending the Gator Carry On Bag from a company called Red Oxx. Right now I will stick with my Jansport backpack but this bag does look promising.
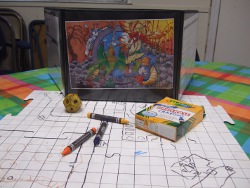
- Savage Worlds Customizable GM Screen – The sturdy Savage Worlds Customizable GM Screen has a landscape layout with inserts for all 6 sides. I really love the fact that I can just replace the inserts with new sheets when I change campaigns. In fact I have several inserts available for download from my site in the Campaigns And Adventures section. The landscape layout is also great as I can still see the players clearly and do not feel fenced off. You can get a copy from Amazon at this
URL for $29.99.
- Standard Wooden Clipboard With A TOPS Engineering Computation Pad – I use a standard wooden clipboard and a pad of engineering paper. Engineering paper has graph paper on the reverse side and is 3 holed punch. You can get TOPS Engineering Computation Pads on Amazon for $19 at this
URL.
- Pentel GraphGear 1000 Mechanical Pencil And Tombow MONO Plastic Eraser – This Pentel is a solid feeling .9mm mechanical pencil that collapses with a click. I like the .9mm lead size as it gives a dark clean line. You can get the pencil on Amzaon for $33.10 at this
URL. I know…it is expensive. The MONO eraser from Tombow is from Japan but they can be purchased at most good stationary stores or online from the manufacturer. It erases very well with no damage to the paper.
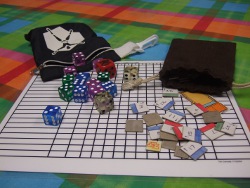
- Battlegraph Dry Erase Boards from Longtooth Studios With Crayola White Board Crayons – Battlegraph Boards are interconnecting gaming squares that are finished like a white board with etched squares. After playing with them now for several months they have really grown on me. I like the fact that 4 of them disconnect and easily fit in my backpack. I also like the way the entire assembled board can be rotated with chits still in place. Boards with squares or hexes are now sold individually for $7 from Longtooth. The Battlegraph Boards really shine with Crayola White Board Crayons. The Crayons don’t rub off as easy as white board pens and don’t smear when touched by a loose finger. I use these suckers for several things during a session…keep reading! 🙂 You can get the Crayola White Board Crayons from Amazon at this
URL for a paltry $4.83.
- Hand Made Chits – Instead of using figures I use cardboard chits roughly 0.75″ square that I cover with Scotch tape. I like using chits because they are easy to cart around, can be flipped, stacked, or placed on top of dice, and they can be colored and numbered for easy reference. I color code and number my chits sequentially so that no two chits have the same number. For example, chits 1-10 are red, chits 11-20 are blue, chits 21-30 are green, etc. This way when I am tracking bad guy stats I just put “13”, “21”, etc on my notes. The colors allow me to differentiate the different types of bad guys (i.e. “the red chits are the PC, the orc are green, and the ogres are blue”).
- Laminated Speed Chart And Big Foam D12 – I run a lot of the Hero System so keeping track of phases and making it public is important. I use a laminated speed chart that Tim Connolly devised. Here is a link to the file on my site. This works great with my Crayola White Board Crayons. The roughly 3″ foam D12 is used to visibly track the phases. Unfortunately I do not have information on who manufactured the foam D12 that I using.
- Plastic Sheets Protectors For Monsters – I bring copies of monsters that will be in the session and several empty plastic sheet protectors. When combat starts I arrange the bad guys in Dexterity order then put them into a sheet protector. During the session I can use my handy dandy Crayola White Board Crayons to record damage and status information.
- Koplow 16mm D6 Dice With Pips And Square Corners – I really have come to appreciate dice that are clear, can be quickly read, and fall fast. I really like the blocks from Koplow as the fit all of these requirements and look darn nice too. 🙂 Here is a link to a set of 12 at FRP Game for $4. I have blue, green, and purple sets right now.
- Larger Clear Dice – I have dice that are a bit larger (0.75″) and clear that I use to delineate characters that are flying or invisible. These really work great for flying character as you can set the top dice face to the height of the character. The slightly larger size makes them a good fit for chits.
- Additional Con Gear – For conventions I like to load my ditty bag with some not so obvious supplies. Some things I like to bring include cough drops, hand sanitizer, multivitamins, and ear plugs. All have an obvious purpose that most convention attendees will understand. 😉
That wraps up my basic gaming kit. What are some items in your standard gaming kit that you think really rock!?! 😀


